沒穿方服

索引

顯示╱隱藏內文
顯示具有 git 標籤的文章。 顯示所有文章

簡言之,編輯完衝突的檔案、用 add stage 起來後,下一步應該是 rebase --continue 才對; 但我一直是 commit,然後才 rebase --continue,大錯啊!

學習 rebase 時一直疑惑「fix conflicts and then run "git rebase --continue」裡的「fix conflicts」到底是什麼動作,最後試出來是 git commit(錯),就一直錯到現在。


示範一下 commitrebase --continue 誤用的慘狀。

  1. 我在 upstream branch。
    Log 最下面的 commit 是沒問題的,但上面兩個 commit 等下會有衝突。
    註:純 demo 方便,通常不會在 upstream 作 rebase

    upstream 的 log
  2. 另一個 branch demo,我做了一個 commit,等下 rebase 時會衝突。

    demo branch 的 log
  3. 開始 git rebase -i demo,果然衝了。

    進行 rebase,產生衝突

    出現 git 提示「fix conflicts and then run "git rebase --continue」。

  4. 手動編輯衝突的檔案(解除衝突),過程省略。

  5. git add . 把解好的部分 stage 起來,到此為止的步驟都沒有問題。

    將檔案 stage 起來,視為已手動解完衝突
  6. 錯誤的做法:git commit
    會進入編輯訊息畫面,預設訊息還會附上 Conflicts: src/vars.js

    使用 git commit 時的 commit 訊息編輯畫面

    雖然覺得奇怪(不是解了嗎?)但習慣後就不會再卡了,還會視情況把 Conflicts: 部分刪掉……

  7. git commit 的結果:

    commit 後的結果

    糟糕的事發生了,author 和 committer 都變成我了,這不能接受啊!

    git 用這麼久,怎麼可能沒發現呢?
    其實印象中有幾次 rebase 後作者變成我,覺得很怪就沒 push 出去,但發生次數很少,大概是不常收 pull request、解衝突時幾乎 author 都是自己吧。

  8. 正確做法 git rebase --continue 後的預設訊息。

    使用 git rebase --continue 時的 commit 訊息編輯畫面

    不但沒有 Conflicts:,也有顯示原作者是誰。

  9. 正確結果,committer 是我,但 author 保持不變。

    continue 後的結果

git config 調整

Git 2.0 RC 1 了,確認一下 push.default 設定。

[push]
  ; git 2.0 以前預設為 matching, 會將所有同名 branch push 出去
  ; git 1.7.6 以前可以用 tracking (deprecated),等於後來的 upstream
  ; git 1.7.11 開始可以使用 simple,即 2.0 預設值
  default = tracking
  default = simple

參考 git-config Documentationpush.default 條。 進行 git push,沒指定 refspec 時,舊預設值 matching 會把 local 的所有 branch,只要 remote 有一樣名字的就推出去。 但通常我們只會改一個 branch,也只有這個 branch 是要給別人看的,如果意外把其它 local branch 也推出去就糟了。 所以選 simple 比較適合,會先試 upstream 的作法把「目前的」branch 推到它的 upstream(可以用 git branchgit push--set-upstream 設定,或直接在 .git/config 中設 [branch.foo] 的 remote);如果 git 找不到已知的 upstream,會再嘗試 current 作法,推到與目前 branch 同名的 branch。


看過 doc 後也順便改了:

  • Config 的各個 key 不分大小寫,但預設產生的是全小寫,於是手動改成 camelCase。
  • [log]
      abbrevCommit = true

    只顯示 hash 的前幾個字,這樣 tmux copy-mode 複製時,用 word selection 取到的東西比較簡短。

  • git branch 的 alias 預設加上 --verbose 選項。

    zshrc:

    alias gitb='git branch -v'

    git branch -v

Gblame 運用

Gblame 是什麼

tpope/vim-fugitive 提供的指令,把 git blame 結果顯示在分割視窗。
裡面按 -~P 可以對其它版本再 blame(詳見 doc),比直接在 command line 操作方便多了。

Gblame 畫面


開啟後自動 resize 到作者名

:Gblame 打開後,預設會顯示到 Date,很佔畫面,按 A 可以縮到 Author。

煩的是沒有選項能自動這件事,只好另設一個 command,在 :Gblame 後多送一個 A

command! -nargs=0 GBlameA Gblame | call <SID>fugitiveblame_after()
function! s:fugitiveblame_after() "{{{
  call feedkeys('A')
endfunction "}}}

然後用 tyru/vim-altercmd 方便輸入……

AlterCommand gb[lame] GBlameA

bling/vim-airline 狀態列

很微小的修改,原本狀態列會顯示 fugitive tmp file 的名稱,我把它改成 "Gblame"。

function! AirlineGblame(...)
  if &filetype == 'fugitiveblame'
    let w:airline_section_a = ''
    let w:airline_section_b = ''
    let w:airline_section_c = 'Gblame'
    let w:airline_section_y = ''
  endif
endfunction
let g:airline_statusline_funcrefs = []
call airline#add_statusline_func('AirlineGblame')

Git compare

配合 bootleq/vim-gitdiffall 使用, 按 gf 將檔案變更以 vim diff 開在新 tab,看那個 revision 改了什麼:

gitdiffall 開在新 tab

<LocalLeader>gf 則是開啟新的 tmux window,把該版本變更的檔案全部打開:

gitdiffall 開在新的 tmux window

function! s:fugitiveblame_gitdiffall(all) "{{{
  let rev = matchstr(getline('.'), '\v^\w{7}')
  let buffer = fugitive#buffer(bufname(b:fugitive_blamed_bufnr))
  if a:all
    call TmuxNewWindow({
          \   "text": "gitdiffall @" . rev,
          \   "title": '⎇',
          \   "directory": buffer.repo().tree()
          \ })
  else
    execute printf("tabnew %s | silent GitDiff @%s", buffer.path(), rev)
  endif
endfunction "}}}

autocmd! my_vimrc FileType fugitiveblame
      \ nnoremap <buffer> gf :call <SID>fugitiveblame_gitdiffall(0)<CR> |
      \ nnoremap <buffer> <LocalLeader>gf :call <SID>fugitiveblame_gitdiffall(1)<CR>
function! TmuxNewWindow(...) "{{{
  let options = a:0 ? a:1 : {}
  let text = get(options, 'text', '')
  let title = get(options, 'title', '')
  let directory = get(options, 'directory', getcwd())
  let cmd = 'tmux new-window -a '
        \ . (empty(title) ? '' : printf('-n %s', shellescape(title)))
        \ . printf(' -c %s', shellescape(directory))
  call system(cmd)
  if !empty(text)
    let cmd = printf('tmux set-buffer %s \; paste-buffer -d \; send-keys Enter', shellescape(text))
    call system(cmd)
  endif
endfunction "}}}

這裡比較悶的是 Gblame 的 mapping 都寫死死,最後只好選 gf 來用。
看 issue 感覺是 tpope 不大想理 mapping 的彈性。

多台電腦 git repository 最簡單的同步方式,應該是把 .git 目錄放在 Dropbox 底下。

在 repository 直接編輯 .git/config,加進一個叫做 {dropbox}remote,url 設成 Dropbox 下的目錄;
再配合該 remote 設定一個叫 {wip}branch。(後面有範例)

然後 cd 到 {dropbox} 目錄,把剛設的 remote url 建立起來: git init --bare

日後只要在 {wip} branch 做 git pullpush 就都是對 Dropbox 動作了。


我在 GitHub fork 別人專案後,通常會建一個 [remote "dropbox"],配合 [branch "wip"] 自己亂改。 寫到一個段落再整理進 master,另外 upstream branch 則是用來跟原作者的進度。

常用 .git/config 樣板

[core]
  repositoryformatversion = 0
  filemode = true
  bare = false
  logallrefupdates = true

[remote "origin"]
  fetch = +refs/heads/*:refs/remotes/origin/*
  url = git@github.com:{ME}/{PROJECT}.git
[remote "upstream"]
  fetch = +refs/heads/*:refs/remotes/upstream/*
  url = git://github.com/{AUTHOR}/{PROJECT}.git
[remote "dropbox"]
  fetch = +refs/heads/*:refs/remotes/dropbox/*
  url = /home/bootleq/dropbox/repository/bare/{PROJECT}/

[branch "master"]
  remote = origin
  merge = refs/heads/master
[branch "upstream"]
  remote = upstream
  merge = refs/heads/master
[branch "wip"]
  remote = dropbox
  merge = refs/heads/wip


; vim: filetype=gitconfig

把 git-diff 的差異開在 Vim 分頁裡,也可以指定要看的版本,用 Vim 查閱 commit 歷史。
bootleq/vim-gitdiffall - GitHub

gitdiffall 指令

zsh 呼叫 gitdiffall 這個指令(目前是用 ruby 寫的,需要系統能跑 ruby)

gitdiffall --help

參數跟 git diff 大致一樣。

查看某個 commit 改的東西

想知道 1836777 這個 commit 改了些什麼。

log graph

使用 gitdiffall @1836777,會比較 1836777 和它的前一個 commit。
註:前一個 commit 不一定是 1836777^,而是從 git log 取出的前一項,這是為了提供更線性的用法。

指定看一個 commit

就會開在 Vim 裡面。

開了 7 個分頁

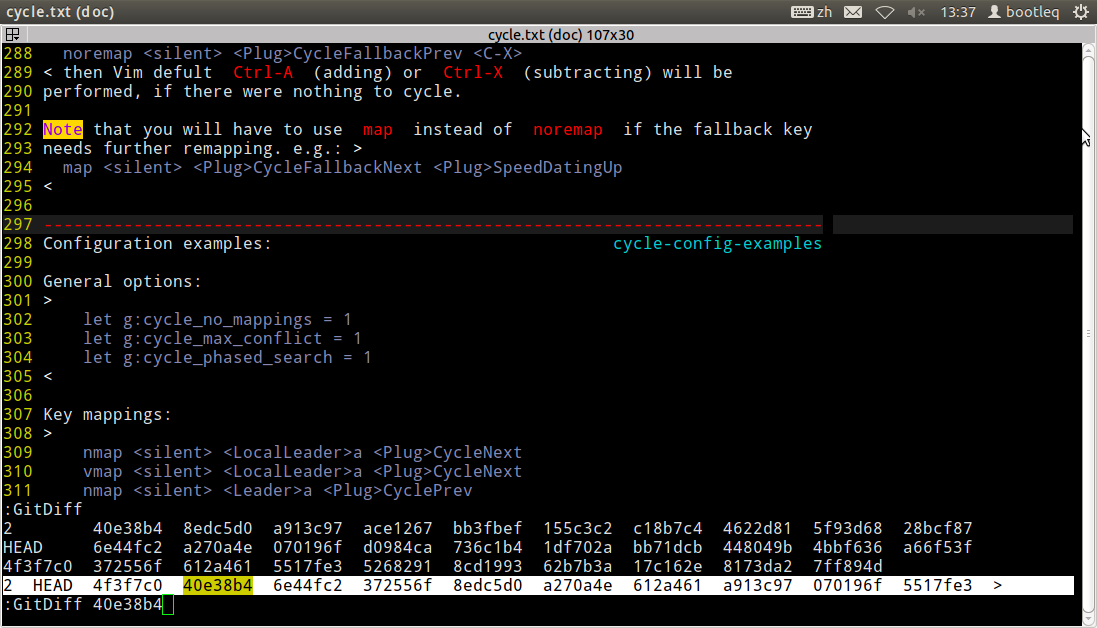
這時可以下 :GitDiffInfo logs(同 :GitDiffInfo 不加參數)看 git log。
但是在 diff 進行中,比較常用的可能是 :GitDiff(同 :GitDiffInfo log,注意參數是 log 不是 logs,後面會說明)。

GitDiff 只顯示一個 log

看完請用 :GitDiffOff 來關閉 diff,確保幾件事:
1. 跳回編輯該檔案的目前版本。
2. 還原比較前的 diff 相關 option(Vim 內建的 :diffoff 會設回預設,不一定是原來的值)。

看完 1836777,想看下一個 commit,因為剛才有顯示 Shortcut for this commit is 7,所以只要 gitdiffall 6 就行了。

看下一個 commit

看現在改了什麼

以下圖來說,gitdiffall 會打開兩個紅色的檔案;
gitdiffall --cached 會打開綠色的。

--cached 和不加任何 revision 的情況

以前寫的將複數 git diff 以 vim 分頁一次開啟,現在可以用 gitdiffall 取代了。

在 Vim 裡使用 GitDiff

在 Vim 裡面也可使用 :GitDiff,會比較目前檔案和它的某個版本,這時就不需要 ruby 了。
參數跟 gitdiffall 類似,也稍微支援自動完成。

Vim 裡的指令也能自動完成

Diff 中可以用 :GitDiffInfo 看比較範圍內「全部 commit」的 log,
加上參數 :GitDiffInfo log 可以看「最相關的一個 commit」的 log(跟前述「GitDiff 時再呼叫 :GitDiff」效果一樣)。

GitDiffInfo 會顯示多個 log

GitDiff 另外支援一個用法,就是 revision 的部分使用 +<n> 的型式,有別於 <n> 是找前一個 commit, +<n> 會找「包含目前檔案」的前一個 commit,可以避免 <n> 找不到變更的情況。

例如 :GitDiff +1

煩惱許久的需求—— git difftool, open all diff files immediately, not in serial - Stack Overflow。具體狀況是:用 git-difftool 呼叫 vimdiff 看變更,會重複「2 files to edit ~ 自動進入 Vim 比較一個檔案 ~ 手動離開 Vim」這個流程,有 10 個(變更的)檔案就會重複 10 次,而且中間不知道怎麼停下來……

原文的解法我沒試成功,而是靠之前寫的 function,加上在 .zshrc 裡設定:

alias gitdiffall='vim -p `git diff --name-only` -c "tabdo GitDiff" -c "tabfirst"'

之後只要輸入指令 gitdiffall 即可。

檔案改到一半發現自己失憶,忘記改了哪些東西,只好跟上次 git push 的狀態比較看看了。

正統作法是在 shell 下指令 git diff,或下 git difftool 用 vimdiff 分割視窗顯示,如下圖,前者在檔案多時容易快速概觀,但單一檔案時還是 vimdiff 方便。

狀況單純的話也很好用 缺點是一次只 diff 一個檔案

目前看到兩個插件 hypergitvcscommand 都可以在 Vim 裡直接顯示 diff 結果,前者是 git-diff 型式,後者是 vimdiff 型式(取出舊版內容,再切割視窗作 vimdiff)。我的需求比較接近後者,但又不想裝整支 vcscommand,於是擅自取出原始碼,改寫進 vimrc。

用到的 git 指令

  • git rev-parse --show-prefix
    若指令來自 git 的子目錄,輸出該目錄對 .git 的相對路徑。
  • git log -1 --format=format:%s\ %n%h' -- '%an' -- '%ai\ '('%ar') HEAD
    顯示 HEAD 所在的一條 log,輸出格式為 [主題] \n[hash 縮寫] -- [作者] -- [日期] ([相對日期]),
    例如 fefe3c8 -- bootleq -- 2010-08-30 18:14:37 +0800 (13 hours ago)
  • git show HEAD:some_path/some_file
    顯示 HEAD 中 some_file 的檔案內容。

原始碼

gist: 558647 - [.vimrc] git diff.

功能說明

  • GitDiff 指令

    輸入 :GitDiff 即可切割視窗顯示目前檔案的 HEAD 版本,可加一個參數指定更早的 HEAD,例如 :GitDiff 99 取得 HEAD~99 版本。顯示後會進入 diff 模式。另外可用 echo t:git_diff_info 顯示該 commit 的簡易資訊。
    GitDiff t:git_diff_info 顯示
    註:指令取的 HEAD~ 並無限制「有變更當前檔案」所以可能往前跳好幾個 HEAD 也看不出變化。
  • MyDiffOff 指令

    因為預設的 :diffoff 指令可能會把本來的 foldmethod 等 diff 相關選項蓋掉,所以改用 :MyDiffOff 來關閉 diff。
    不過也只是設回我的預設值,沒有真的建立暫存/重設機制。
  • GitDiffOff 指令

    進入 :GitDiff 後,用 :GitDiffOff 快速恢復到原始狀態。(目前只支援從兩視窗的狀態復原)